Drawing Graphics
Much like the first and second generations of 3D consoles, DreamBox has a completely fixed-function graphics pipeline. What does this mean?
Well, it means in DreamBox games there is no such thing as a shader - you can draw geometry with vertex colors & textures and that's it.
There's an extra important wrinkle for drawing 3D graphics in DreamBox, but we'll get to that in a bit
All of the functions for drawing graphics in Dreambox are in the vdp module. This module interacts with the Video Display Processor,
or VDP for short.
Clearing the screen
The first thing you probably want to do is clear the framebuffer. There are two commands for this:
// clear framebuffer & depth buffer
vdp::clear_color(vdp::Color32::new(128, 128, 255, 255));
vdp::clear_depth(1.0);
clear_color just clears the screen to the given color. However, there's also clear_depth - this command clears the depth buffer as well,
which is important if you want to draw 3D graphics.
In general, the depth buffer is set up so that 0.0 is the near plane and 1.0 is the far plane, so clearing to 1.0 clears the whole depth buffer to the far plane.
Setting blend modes
Something else you'll probably want to do a lot is configure blending:
// set up opaque blending (new color * 1.0) + (old color * 0.0)
vdp::blend_equation(vdp::BlendEquation::Add);
vdp::blend_func(vdp::BlendFactor::One, vdp::BlendFactor::Zero);
If you've ever used any graphics API these should immediately be familiar to you - this pair of lines configures the blending equation.
The blending equation controls how new pixels are combined with existing pixels in the frame buffer.
Setting up the depth test
Once again, setting up depth test & depth write should be very familiar to you if you've used another 3D graphics API such as OpenGL or DirectX
// enable depth writes & set depth test to pass wherever new depth is less than or equal to value in the depth buffer:
vdp::depth_write(true);
vdp::depth_func(vdp::Compare::LessOrEqual);
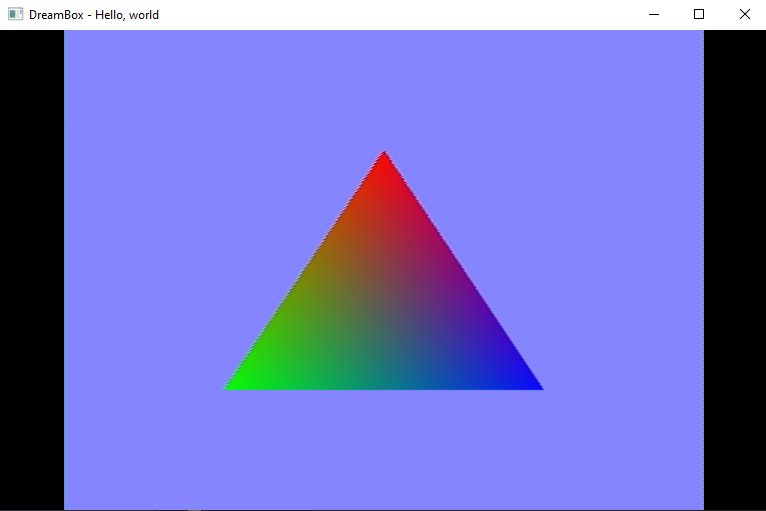
Drawing triangles
With that all out of the way, you are now ready to draw triangles!
This is actually very simple - there's just one command and one vertex format:
// draw a single triangle
let triangles = [
    vdp::Vertex::new(
        Vector4::new(0.0, 0.5, 0.0, 1.0),
        Vector4::new(1.0, 0.0, 0.0, 1.0),
        Vector4::zero(),
        Vector4::zero()),
    vdp::Vertex::new(
        Vector4::new(-0.5, -0.5, 0.0, 1.0),
        Vector4::new(0.0, 1.0, 0.0, 1.0),
        Vector4::zero(),
        Vector4::zero()),
    vdp::Vertex::new(
        Vector4::new(0.5, -0.5, 0.0, 1.0),
        Vector4::new(0.0, 0.0, 1.0, 1.0),
        Vector4::zero(),
        Vector4::zero()),
];

vdp::draw_geometry(vdp::Topology::TriangleList, &triangles);
If you run this, you should see your triangle drawn to the screen!
Transform & Lighting
So I just said that there's only one vertex format and one draw command. You might be wondering: "Wait, how do I pass a projection matrix?
How do I pass in normals for lighting?"
Well, remember when I said there's a really important wrinkle earlier? Here it is:
There is no such thing as a projection matrix or lighting step in DreamBox.
Yes, that sounds extremely limiting - but limitations are half the fun of a fantasy console, right?
OK, so how DO you perform lighting in DreamBox? The answer is you calculate all of the values yourself, right on the CPU.
This sounds like it'd be really performance intensive, and it kinda is, but this is exactly how at least two of the second generation of consoles worked.
You just have to be careful with how much geometry you're drawing to make sure it doesn't become too much for the CPU to handle.
There is good news: DreamBox does provide limited access to SIMD optimizations for matrix operations, and you can use this API to transform a whole array of vertices at once.
Performing vertex transforms
Everything we need to transform our vertices is provided in the math module. We're going to add a simple orthographic projection matrix to our code.
Right before we pass our vertex array to draw_geometry, add the following lines:
let ortho = Matrix4x4::projection_ortho_aspect(640.0 / 480.0, 1.0, 0.0, 1.0);
Matrix4x4::load_simd(&ortho);
Matrix4x4::transform_vertex_simd(&mut triangles, offset_of!(vdp::Vertex => position));
First, we create an orthographic projection matrix with the desired aspect ratio, a vertical frustum height of 1.0, the near plane at 0, and the far plane at 1.
Next, we load this into the internal SIMD matrix register.
Finally, we transform the positions of each vertex in our array with the matrix we stored in the SIMD matrix register.
The results:
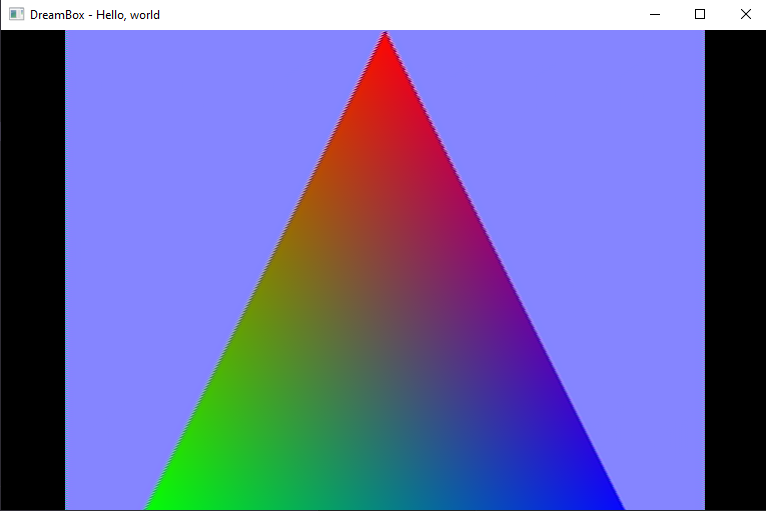
Note that because the size of our frustum is 1.0, it ranges from -0.5 to 0.5 in clip space - which means our triangle now fills the whole screen.
Lighting is beyond the scope of this guide, but keep in mind that in general you would compute the lighting values and store them in the color field of each vertex.
Additionally, note the extra "ocolor" field - each vertex actually has two colors, the second one being an offset color which is added to the result of (vertex color * texture color)
and can be used as an extra additive color (for example, for specular highlights)
Textures
What about textures? Well, how to actually load texture data from files is beyond the scope of this guide, but in general to use textures you first create a new Texture:
// allocate a 128x128 32-bit RGBA texture with mipmaps disabled.
// This will return UINT32_MAX if allocation fails due to exhausting texture memory
let texture = vdp::Texture::new(128, 128, false, vdp::TextureFormat::RGBA8888)
    .expect("Failed to allocate texture");
There are a handful of other texture formats in DreamBox as well (RGB 565, RGBA 4444, RGBA 8888, DXT1, and DXT3 are all supported).
Next, you upload data to this texture:
// upload pixel data to the first mip level of our texture
let colors = [vdp::Color32::new(255, 255, 255, 255); 128 * 128]; // 128 x 128 array of (255, 255, 255, 255)
texture.set_texture_data(0, &colors);
When drawing, set the currently active texture before calling vdp_drawGeometry:
// set our texture as active (pass None to set no texture)
vdp::bind_texture(Some(&texture));
The texture will automatically be deallocated when this handle reaches the end of its lifetime.